backup
How can I export my network of tracks
14/02/13 00:58 Filed in: Network of Tracks
Problem: your network of tracks may have gotten very huge or contains some corrupted items you can't identify. Therefore you may want to start anew or make some kind of backup.
Solution: in network tracks mode, select a range of objects and Edit > Copy these. The clipboard now contains GPX fragments of these items. You can paste that into a second TrailRunner document or into any text file.
Tip: you can also use this technique to give parts of your network of tracks to a friend for that he/she can import these segments.
Document Versions on Mac OS X 10.7 Lion
11/09/11 13:52 Filed in: Conceptual
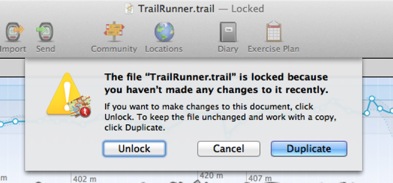
Background: This is a new system wide behavior in Mac OS X 10.7 Lion to prevent users from accidentally overwriting a documents content if not used for a longer time. In TrailRunner however it does not (always) make sense, because you generally work with only one document, which is TrailRunner.trail, stored in your Application Support folder. But the new versioning mechanism itself does makes sense, as it is a fast backup restoration method while working in your network of tracks and accidentally breaking up things.
Solution: Whenever this dialog comes up, klick on the Unlock button, because that is what you would expect.
Sidenote: Interestingly even Apple itself has some problems with the new system feature.
Share diary and document between different Macs
13/04/14 16:07 Filed in: Diary
Problem: You have a Mac at home and one at work. You would like to synchronize your TrailRunner diary with these two computers.
Solution: TrailRunner supports Dropbox. You can put the TrailRunner documents into your Dropbox and the data gets synchronized between all linked computers.
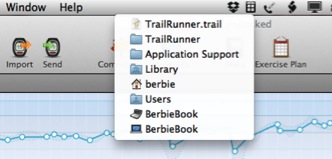
As you might already know, TrailRunner stores all vital information within your home directories Application Support folder
To move your TrailRunner data to Dropbox, follow these steps:
- Download and install Dropbox.
- By default, Dropbox creates a new folder in your home directory called
- Open this folder and make sure that a folder named
- Now go to:
- Within, find the folder named
Next time you start up TrailRunner, the application will check on if your home directory contains the following folder:
If that's the case, TrailRunner will access this location instead of the default
If the default folder does not suit you, these alternatives are also looked into:
As this folder now is located within your dropbox, it is automatically being backed up and synchronized between all computers being linked to your dropbox.
Solution: TrailRunner supports Dropbox. You can put the TrailRunner documents into your Dropbox and the data gets synchronized between all linked computers.
As you might already know, TrailRunner stores all vital information within your home directories Application Support folder
To move your TrailRunner data to Dropbox, follow these steps:
- Download and install Dropbox.
- By default, Dropbox creates a new folder in your home directory called
Dropbox.- Open this folder and make sure that a folder named
Documents exists within. If this is not the case, create one with the exact spelling.- Now go to:
[yourhome]/Library/Application Support/- Within, find the folder named
TrailRunner and move this into the aforementioned Documents folder.Next time you start up TrailRunner, the application will check on if your home directory contains the following folder:
[yourhome]/Dropbox/Apps/TrailRunner/Application SupportIf that's the case, TrailRunner will access this location instead of the default
Library/Application Support location.If the default folder does not suit you, these alternatives are also looked into:
[yourhome]/Documents/Dropbox/Apps/TrailRunner/Application Support [yourhome]/Dropbox/Apps/TrailRunner/Application Support [yourhome]/Dropbox/Documents/TrailRunner[yourhome]/Shared/Library/Application Support/TrailRunnerAs this folder now is located within your dropbox, it is automatically being backed up and synchronized between all computers being linked to your dropbox.
How can I backup my files
04/01/13 22:34 Filed in: Diary
Problem: It's not really obvious to me where TrailRunner stores the main document containing routes and the database containing my diary activities. How can I backup these files?
Solution: TrailRunner stores files in the following folders. Backup these folders/files and your personal data is safe.
__yourhome__/Library/Application Support/TrailRunner
__yourhome__/Library/Preferences
__yourhome__/Library/Caches/com.berbie.trailrunner
> Read More about what files TrailRunner writes to your harddrive…
Hint: Another alternative to backing up your files is to place them in Dropbox. This also enables you to synchronize with other computers you own:
> Read More about how to synchronize your diary with other computers…
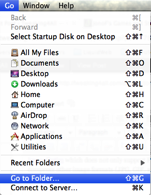 Hint: on Mac OS X Lion the __yourhome__/Library folder is invisible by default. But just hold down the option key while pulling down the Finder's "Go" menu to get there. Or you can make it permanently visible using the following terminal command:
chflags nohidden ~/Library/
or you can open it by typing the following into the Finder menu item Go > Go to Folder box:
~/Library
Solution: TrailRunner stores files in the following folders. Backup these folders/files and your personal data is safe.
__yourhome__/Library/Application Support/TrailRunner
__yourhome__/Library/Preferences
__yourhome__/Library/Caches/com.berbie.trailrunner
> Read More about what files TrailRunner writes to your harddrive…
Hint: Another alternative to backing up your files is to place them in Dropbox. This also enables you to synchronize with other computers you own:
> Read More about how to synchronize your diary with other computers…
chflags nohidden ~/Library/
or you can open it by typing the following into the Finder menu item Go > Go to Folder box:
~/Library